Calibration methods
Robot calibration serves to enable the conversion of image coordinates into world coordinates.
As a result, all coordinate outputs (positions and measurement results) are calculated and output in the selected unit.
There are various calibration methods for applications in the field of robotics.
These include:
The robot calibrations first convert pixels into metric or imperial units and correct distortions and tilted viewing angles. In addition, the camera coordinate system is projected
onto that of the robot so that the robot can now move directly in its coordinate system with the position data supplied by the sensor and, for example, grasp a part.
Goals of calibration - why is calibration important?
![[SSP-069] Robotics - Pillar Page - Accuracy Image [SSP-069] Robotics - Pillar Page - Accuracy Image](https://info.sensopart.com/hs-fs/hubfs/Campaigns_international/2023/Robotics/Pillar%20Page%20Imagery/Work%20Smarter%20Images/%5BSSP-069%5D%20Robotics%20-%20Pillar%20Page%20-%20Accuracy%20Image.png?width=200&height=200&name=%5BSSP-069%5D%20Robotics%20-%20Pillar%20Page%20-%20Accuracy%20Image.png)
Determining the reference system
Calibration of the vision sensor thus enables precise and reliable detection of workpieces and objects in the robot’s working area.
![[SSP-069] Robotics - Pillar Page - Accuracy Image [SSP-069] Robotics - Pillar Page - Accuracy Image](https://info.sensopart.com/hs-fs/hubfs/Campaigns_international/2023/Robotics/Pillar%20Page%20Imagery/Work%20Smarter%20Images/%5BSSP-069%5D%20Robotics%20-%20Pillar%20Page%20-%20Accuracy%20Image.png?width=200&height=200&name=%5BSSP-069%5D%20Robotics%20-%20Pillar%20Page%20-%20Accuracy%20Image.png)
Pixel measurement unit conversion
Calibration enables the conversion of pixels into a measurement unit, which is needed to determine the exact position of objects in the field of view of the vision sensor.
![[SSP-069] Robotics - Pillar Page - Accuracy Image [SSP-069] Robotics - Pillar Page - Accuracy Image](https://info.sensopart.com/hs-fs/hubfs/Campaigns_international/2023/Robotics/Pillar%20Page%20Imagery/Work%20Smarter%20Images/%5BSSP-069%5D%20Robotics%20-%20Pillar%20Page%20-%20Accuracy%20Image.png?width=200&height=200&name=%5BSSP-069%5D%20Robotics%20-%20Pillar%20Page%20-%20Accuracy%20Image.png)
Distortion correction
The robot calibration also enables the correction of distortions caused by the optics of the vision sensor.
![[SSP-069] Robotics - Pillar Page - Accuracy Image [SSP-069] Robotics - Pillar Page - Accuracy Image](https://info.sensopart.com/hs-fs/hubfs/Campaigns_international/2023/Robotics/Pillar%20Page%20Imagery/Work%20Smarter%20Images/%5BSSP-069%5D%20Robotics%20-%20Pillar%20Page%20-%20Accuracy%20Image.png?width=200&height=200&name=%5BSSP-069%5D%20Robotics%20-%20Pillar%20Page%20-%20Accuracy%20Image.png)
Tilt correction
Calibration also allows correction of tilt between the vision sensor and the measurement plane to ensure accurate measurements.
![[SSP-069] Robotics - Pillar Page - Accuracy Image [SSP-069] Robotics - Pillar Page - Accuracy Image](https://info.sensopart.com/hs-fs/hubfs/Campaigns_international/2023/Robotics/Pillar%20Page%20Imagery/Work%20Smarter%20Images/%5BSSP-069%5D%20Robotics%20-%20Pillar%20Page%20-%20Accuracy%20Image.png?width=200&height=200&name=%5BSSP-069%5D%20Robotics%20-%20Pillar%20Page%20-%20Accuracy%20Image.png)
Output of world coordinates
Calibration enables the output of world coordinates in the robot coordinate system to enable the accurate positioning of workpieces and objects in the robot’s working area.
![[SSP-069] Robotics - Pillar Page - Accuracy Image [SSP-069] Robotics - Pillar Page - Accuracy Image](https://info.sensopart.com/hs-fs/hubfs/Campaigns_international/2023/Robotics/Pillar%20Page%20Imagery/Work%20Smarter%20Images/%5BSSP-069%5D%20Robotics%20-%20Pillar%20Page%20-%20Accuracy%20Image.png?width=200&height=200&name=%5BSSP-069%5D%20Robotics%20-%20Pillar%20Page%20-%20Accuracy%20Image.png)
Definition of references:
reference system
The robot calibration also enables the correction of distortions caused by the optics of the vision sensor.
Calibration of the vision sensor thus enables precise and reliable detection of workpieces and objects
in the robot’s working area.

Calibration plate - camera mounted on arm or stationary
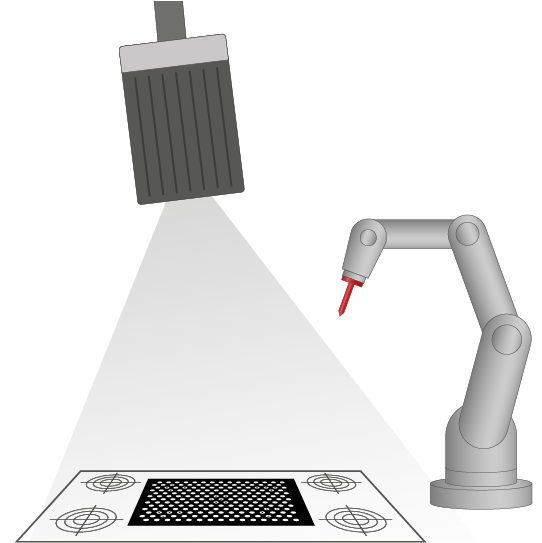
With this calibration method, the absolute positions in the robot coordinate system are determined by means of a “calibration plate”. The user can determine the position of the plate in space via applied reference marks with the help of a measuring tip. To do this, one or more images of the calibration plate are taken and four reference marks are taught in. The coordinate values determined in this way are then entered into the VISOR® configuration software. This teach-in process transforms the image coordinates of the robotic sensor into the world coordinates of the robot.
After calibration, the robot can process the sensor coordinates immediately, so that the programming effort on the robot side is significantly reduced. If the geometry of the parts to be detected changes at a later date, the calibration can be easily adjusted afterwards. In this way, various automated gripper corrections as well as a height offset between the measuring and calibration planes (Z offset ) can be taken into account. This method is suitable, for example, for picking parts from a vibration feeder or from a conveyor belt with a stationary mounted VISOR® Robotic.
Point pair list
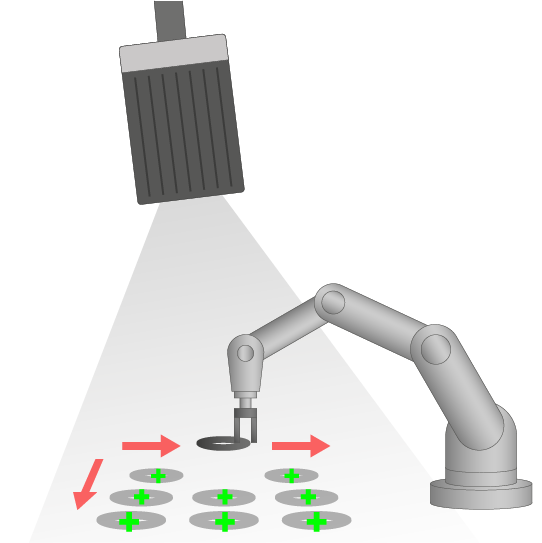
The calibration method "point pair list" is a calibration on the work object and thus does not require a calibration plate. Real components are placed in the field of view of the VISOR® and the component coordinates in the image (px) are determined and linked to a corresponding position in the robot coordinate system ("world"). The calibration can be calculated using several of these point pairs.
After the calibration of the sensor, the position of the part to be gripped by the robot is directly available in the absolute coordinate system of the robot. The calibration method provides the conversion from pixel to measuring unit, distortion correction, correction of tilt between VISOR® and measuring plane as well as the output of the world coordinates in the robot coordinate system.

Hand-eye calibration - camera mounted on arm
"Hand-eye calibration" is an effective method to calibrate sensors mounted on the robot arm, such as in automated gripping or screwing of objects.
A major advantage of this method is that in applications with a camera mounted on the robot arm, this flexibility can be used to move the workspace in the robot workspace. This results in a high degree of flexibility. To make the most of this advantage, special functions such as "Trigger Robotic" are available to inform the VISOR® of the changed position. All calculations are then carried out taking this new position into account. It should be noted that the calibration itself does not become more accurate - the exact position is, however, a prerequisite for successful calibration in the first place.
Another major advantage is that the hand-eye calibration can be 100% automated. This opens up possibilities for regular checks (validations) as well as an efficient solution for getting the system back into operation in the shortest possible time in the event of a robot crash, without having to rely on specialised expertise.
In contrast to classical calibration methods, the field of view of the sensor during calibration and the working area of the robot do not have to be identical in hand-eye calibration. This means that the user can calibrate the sensor in one location and then use it in another location of the robot's working area. Via a trigger, the user can send the current position of the robot to the VISOR® Robotic to perform a precise calibration. This is particularly useful if the spatial conditions do not allow the placement of a calibration plate. Hand-eye calibration is thus a flexible and reliable method to improve the accuracy of sensors on the robot arm. A typical application is the emptying of load carriers.
Hand-eye calibration no longer requires manually approaching real points or gripping components. In order to map the complete coordinate system with reference to the tool centre point (TCP) of the robot, it is sufficient to take at least ten images of the calibration plate attached to the robot arm in different positions. If required, an additional "result offset" is possible in order to shift the result points of the vision sensor mathematically to the desired working points of the robot. In this way, the sensor can be taught to the contour of a cup, for example, while the robot's gripping point is at the handle.
Base-Eye Calibration - camera Stationary Mounted
SensoPart's "base-eye calibration" is a calibration method that is particularly suitable for applications in which the vision sensor is mounted in a stationary position - for example, when fine positioning components in the gripper. In contrast to classical calibration methods, it is no longer necessary to manually approach real points or to grip components. To map the complete coordinate system, it is sufficient to take at least ten images of the calibration plate in different positions. If required, an additional "result offset" is possible in order to shift the result points of the vision sensor mathematically to the desired working points of the robot. After "reaching into the box",
each component is held briefly in front of the sensor and its exact position is thus recorded. In the downstream work step, for example when the part is placed down, the gripper position is then corrected accordingly. For example, the sensor can be taught to the contour of a cup while the robot's gripping point is on the handle. A typical application is picking from the load carrier and compensating for the automated gripping point offset.
Get the brochure
Find out how you can automate smarter with easy-to use calibration methods.
Adapt fast and better meet the needs of your business challenges with VISOR® Robotic series vision sensors.
